A blog full of 28mm Superheroes, Villains and Henchmen (Plus a bit of whatever catches my eye)
Showing posts with label British. Show all posts
Friday, 2 November 2018
Home Front: Civilians and Secret Agents.
I have recently been rebasing and touching up a few figures for use with my WW2 Operation Sealion collection. Most of these figures I painted for VBCW or Pulp gaming, but are generic enough in style to be of use for the 1940/41 home front. These will be civilians (the unarmed ones) , spies, secret agents, fifth columnists and other dodgy types. I have got an idea to run a game of Black Ops for Operation Sealion, for which these figures shall come in jolly handy.
Saturday, 27 January 2018
Home Front: A Few More Home Guard
My favorite one is the old guy having a tea break. I just hope Jerry doesn't invade while he is brewing up!
Thursday, 11 January 2018
Home Front: Civilians and Volunteers
Apologies for the dodgy photos but the light has been very poor this week in the UK. Here are a few more additions to my Home Front collection. First up...and old man, This one is made by Foundry and is a Perry Sculpt. Just a nice useful civilian figure...also useful for VBCW.
Next, Mr Churchill...or perhaps an actor impersonating the Prime Minister? Not a great sculpt, I forgot where and when I got it, but I think it might be from Westwind. Useful as an objective in some scenarios.
And finally two of the cast of Dad's Army in their civvies. Sargent Wilson and Lance Corporal Jones from Warlord. Lovely Sculpts, full of character, by Mr Hicks.
Labels:
Bolt Action,
British,
Civillian,
Home Front,
Home Guard,
WW2
Saturday, 6 January 2018
Home Front: Dad's Army Cast.
Nice additions to my growing collection.
Labels:
Bolt Action,
British,
Home Front,
Home Guard,
WW2
Monday, 20 June 2016
Peninsular War: Sharp Practice Battle Report- Escort Duty
Vlad and I randomly rolled up a mission. He played the French again, and I was the British. Vlad's force comprised of four groups of Line Infantry, two groups of Voltiguers and a group of Grenadiers. It was commanded by Colonel Le Grande Fromage, and the light infantry was lead by Irish-American Captain Slain. He had another Status II leader and a Status I leader. He took a musician and a preacher (although we felt it wasn't appropriate for the atheist French to have a preacher to we called her a spy- but all the basic rules applied- her names was Madam Petit).
I had five groups of Line Infantry, one group of Highland regular infantry and a group of Highland Light Infantry. I took a physic (in the form of Spanish Surgeon Don Cortador) and a musician. My force was commanded by Major Ramsbottom, ably assisted by the Hanoverian Captains Wankmuller, and Sargent Wullie of the Highland Light Infantry.
The British engineers are rebuilding an old Spanish fortress that has been partially dismantled by the French and are desperately short of tools and building materials. Major Ramsbottom of the KGL has been tasked with protecting a delivery of these vital supplies to the fortress. Colonel Le Grande Formage has been ordered to intercept the delivery.
This is the battle field we were using. I had to deliver my supplies up the road that runs along side the two farm houses on the left side of the board, escaping off the far side. The french were deploying in the hills to the far right hand side.
Major Ransbottom, not expecting an attack, had his men deployed in column of march to try to make as much progress as he could. The Major was lead his KGL formation at the front of the column, and Captain Wankmuller lead his Hanoverian/Scottish formation to the rear of the column. The Highland Light Infantry were deployed on the flank as a token effort to prevent any ambushes.
The Light Infantry spotted the French advancing through the olive trees and open fire on their flanks, killing one.
Captain Wankmuller ordered his men to form a line and began turning it to face the threat. It manoeuvred slowly over the uneven field. |
|
Meanwhile Captain Slain led his French and Irish Voltigeures to outflank the Highland Light Infantry, forcing the Scotsmen to withdraw to the safety of the British lines, and preventing them gaining enfilading fire on the advancing French line.
The French Line continue to struggle with the terrain but eventually they manage to fan out into one long line with four groups facing the three of the KGL. The French then unleashed a crashing volley on two consecutive turns causing a massive 20 shock to the KGL (it should have been more but we later realised Vlad only rolled 24 dice each volley and not the 31 that he should have done). The KGL held the line but the shock effectively rendered them fairly ineffective for the rest of the game.
Captain Wankmuller lead his Hanoverian-Scottish formation out and they confronted the French line, and unlished several controlled volleys into the French line at effective range thanks to their Sharp Practice ability. Added to this was the enfilading fire from what was left of the Highland Light Infantry. The combined fire was too much for the conscripts in the French line who broke formation and fell back before the onslaught.
Colonel le Grande Fromage managed to reform his shattered line but they were pretty beaten up and needed a few turns of respite to get back in fighting order. To give them the break they needed the Volitigeurs and the Grenadiers advanced towards Captain Wankmuller's line and launched a volley. Wankmuller's line held, although it suffered some casualties and Captain Wankmuller himself was injured he took a musket ball to his calf. The Hanoverian-Scottish reply was a volley that took out half the grenadiers. The grenadier sergeant was rendered senseless by a musket ball that glanced off his scalp. His men carried him back to safety behind the grove of olive trees.
Captain Slain's Volteigures continued to press their attack, firing again at the Hanoverian-Scottish formation. Despite his wound Captain Wankmuller held his men in check and they returned the volley, wounding Captain Slain. The voltiguers withdrew behind the stone walls.
The supply cart slowly made its way up the hill towards the safety of the Anglo-Spanish fortress. The French were forced to concede that there was little they could do to stop it, and Colonel le Grande Formage reluctantly gave the order for his men to withdraw, which they did in good order, taking their casualties with them. The British lacked to will or the ability to press home their advantages, and allowed them to go.
By the end of the game the French line and the two British lines were badly beaten up and in no state to press the attack. The KGL had never really recovered from the two crashing volleys, although they had only suffered a single casualty the shock they had suffered meant they really weren't fit for much. The Hanovarian-Scottish formation was equally beaten up, and had suffered a lot of casualties, and Captain Wankmuller was loosing a lot of blood from his nasty leg wound.
The French had suffered to, they had lost half their grenadiers and almost half their line infantry, and their morale was severely depleted. The grenadier sergeant was still unconscious and Captain Slain of the voltigeurs had been lightly wounded too.
Vlad wants to refight this one soon. Their are a lot of variables in this mission, such as where both sides deploy, and how much progress the cart can make before the french appear. I think I had things easy, as Vlad was hampered by the terrain and I managed to get the cart halfway up the board before being ambushed. A refight might make a very different game.
Labels:
Battle Report,
British,
French,
Napoleonic War,
Peninsular War,
Sharp Practice
Wednesday, 8 June 2016
Peninsular War: Le Grand Fromage strikes back!
Vlad and I got another game of Sharp Practice in last week. After our first game I realised I had made a few mistakes- such as giving the British army a six point advantage by giving them an extra Status II officer they were not entitled to. With this mistake rectified Vlad and I decided to fight out another battle. Given that I have been busy making lots more terrain this last fortnight, our board was quite densely packed with scenery, which made it an interesting game- slightly more difficult for manoeuvre large formations, and perhaps favouring skirmishers.
We took the same basic forces from the rules and had eight points left over for support choices. Vlad, playing Colonel Le Grand Fromage, opted to take a drummer, a secondary deployment point and a group of Grenadiers. I was playing Major Ramsbottom, and opted to change my light infantry for a group of Riflemen, and to upgrade one rifleman to a marksman. This proved to be a decisive point, as the Riflemen were useless and the Grenadiers saved the day...as you will soon see.
This was the battlefield. We randomly determined where we would set up our deployment points and found we both set up on the lane that bisects the board along the front of the larger farm house. This meant we would be deployed pretty much facing each other.
My men deployed first, and I managed to get my Riflemen into the big farm house, and they took up positions on the balcony. Because they are light infantry this light cover is upgraded by one level to hard cover- I felt pretty confident that they would be able to command the battlefield from up there.
My Hanoverian Regiment moved in column of march as fast as they could towards the large farmhouse.
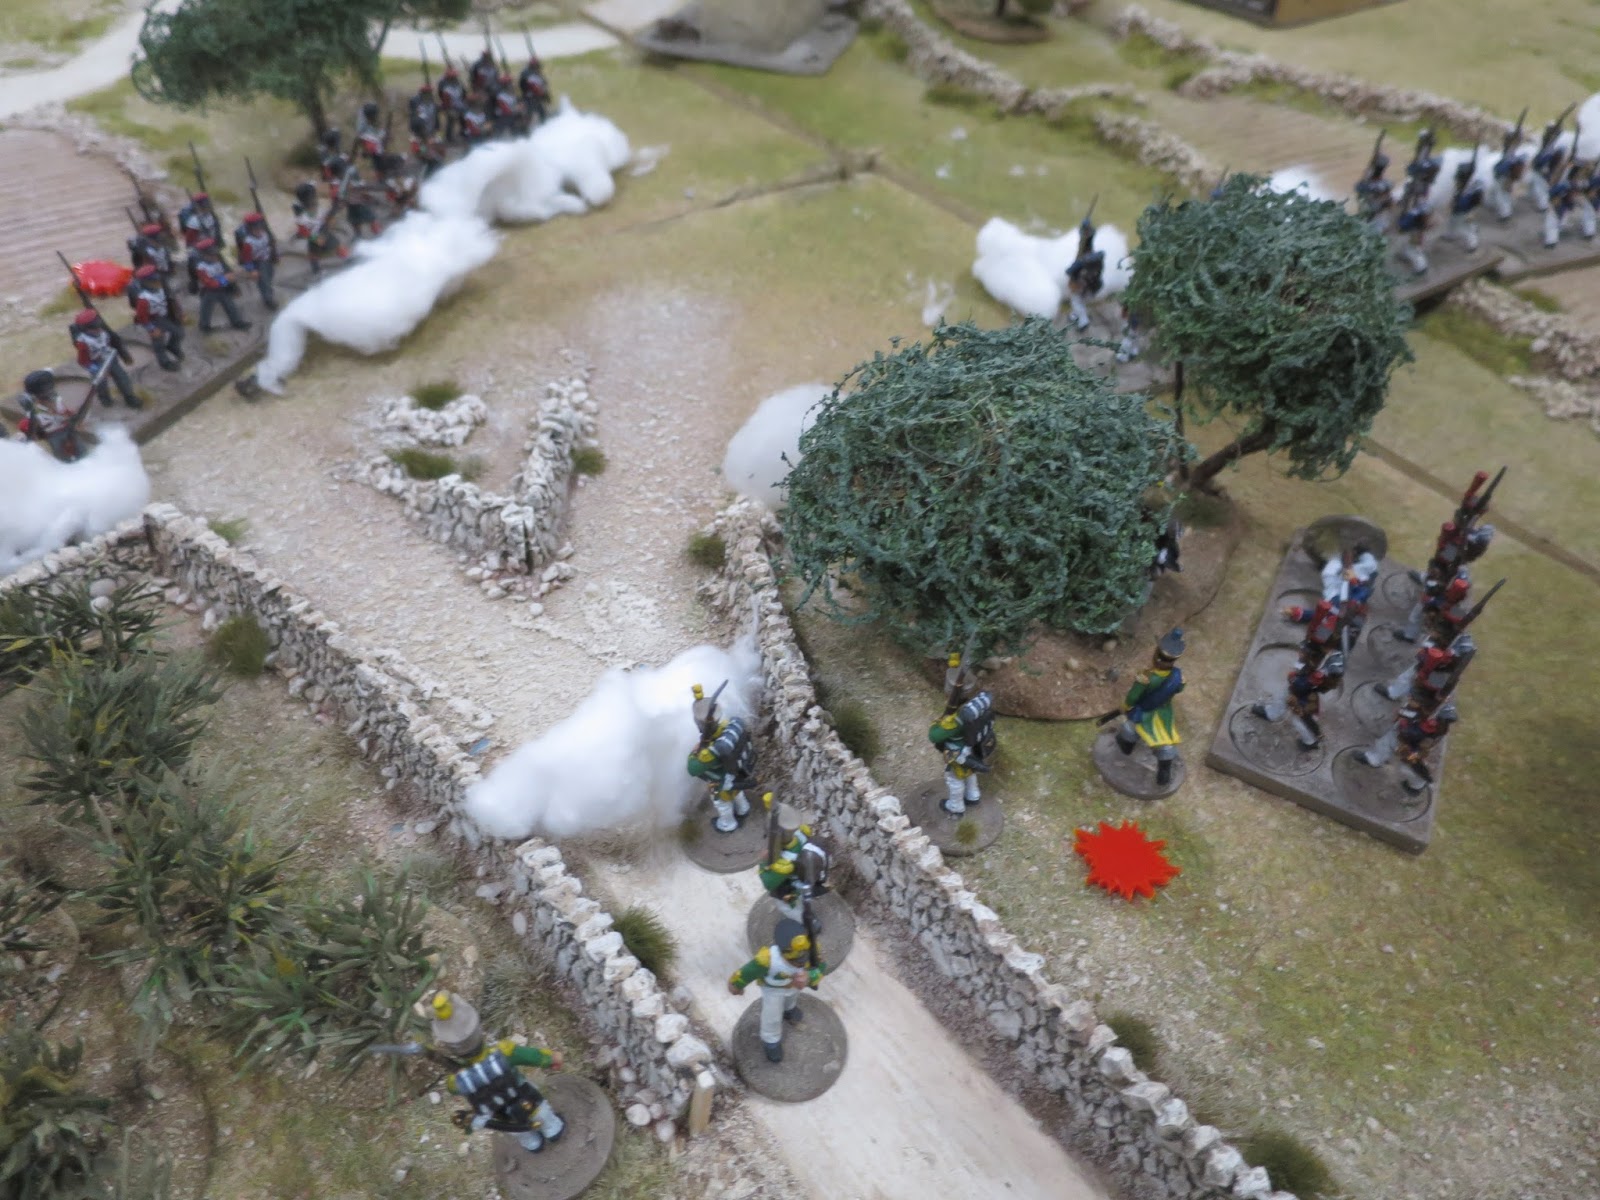
Vlad deployed his Voltigeur skirmishers, and the fighting began- they peppered my riflemen with musket balls- killing three of them! The rifles shot back only killing one voltigeur- first blood to Vlad.
The Kings German Legion arrived with Major Ramsbottom and proceeded to struggle to advance - having to break formation to move through the orange grove. Eventually they reformed in hard cover from the orange groves stone walls.
Colonel Le Grand Fromage deployed his line troops opposite the KGL, forming two formations into one massive formation. They had no cover, and so in theory the KGL had all the advantages, even though I was out numbered three groups to four.
The Hanoverian's attempt to flank the French line was blocked by the timely arrival of the French Grenadiers. These brave, stubborn Frenchies were outnumbered, but they had to hold or the Hanoverians would have had enfilading fire onto the French line.
Captain Slain, the Irish-American volunteer commanding the French voltigeurs lead his men to the KGL's flank, and soon their short range shots were ripping into the KGL's unprotected flanks.
The Hanovarian captain charged into the French Grenadiers, hoping to dislodge them and force the French line to change formation, providing relief for the KGL. Although the British had the advantage in the fight they were repelled, and the Grenadiers continued to hold their position on the flank, and the French line continued to hammer the KGL.
Major Ramsbottom tried in vane to hold his line together, but the enfilading fore from the Voltigeurs on their flank was too much for the KGL, and they started to fall back, breaking formation. Ramsbottom reformed the line twice, but in the end the French attack was too much for the Germans and they broke, and Major Ramsbottom was forced to concede the field and order his remaining men to withdrew, leaving the village to the Colonel Le Grande Fromage.
Colonel Le Grand Fromage- Victor of the day!
On reflection it was easy to say what went wrong- I deployed my Riflemen very badly, exposing them to musket fire from the Voltigeurs from the outset. This one group had cost 14 points, and it far to brittle to stand up to the accurate fire of the French skirmishers. Upon reflection should have sat them back in a good position to protect the KGL's flank, and just sniped off the French skirmishers, taking advantage of the rifles longer ranges.
The French grenadiers did a fantastic job of holding the flank from the Hanoverian attack. Their stubborn refusal to give in, and their robust repulsion of the Hanoverian's charge meant that the French line could concentrate on the KGL- wining Vlad the game.
It just shows that the choices you make for the support units are sometimes the decisive factor in a battle.
Labels:
Battle Report,
British,
French,
Napoleonic War,
Peninsular War,
Sharp Practice
Tuesday, 17 May 2016
Peninsular War: First Game of Sharp Practice
This Sunday say my first opportunity to play Sharp Practice 2 down at Earlswood. I refereed the game while Vlad and Dean played the French, and James and Dave played the British.
The French commander, Colonel le Grand Fromage, was leading a force of three groups of line infantry and a group of grenadiers supported by a large skirmish screen of three groups of French and Irish voltegeurs. The British commander, Major Rodger Ramsbottom, lead a force that was larger, and consisted of three groups of King's German Legion (regular line), one group of Highlanders (regular line), one group of Highland Light Infantry (skirmishers), two groups of of Hanoverian Regiment (regular line) and a group of Portuguese Cacadores fighting in line.
The table was set and sides chosen at random. The battle was the basic battle mission for the rules- keep things simple for the first game. Because the random location of the deployment point meant that they set up at opposite ends of the table the game ended up being fought down the length of the table. The British set up inside a farm with sturdy walls, while the French were advancing from the open farmland.
The initial few turns of the battle favoured the French as they were able to get a lot of their men onto the battlefield before the Britsih could get organised. Major Ramsbottom led the Portuguese and the Highlanders out onto one flank to protect the farm, while the Hanoverians took up position along the walls of the farm yard. The Portuguese and Highlanders faced two formations of the French- (they were outnumbered 2-1) but their orders were to hold at all costs. If the French could break their flank the Hanoverian would be in trouble as the French and Irish Voltiguers were getting in position to out flank them.
The decisive pivot point in the battle came when the King's German Legion turned up, along with a detachment of they Highland Light Infantry, and suddenly the tide seemed to turn in the battle. The Voltiguers who had, up until now, enjoyed the advantages of being able to snipe at the Hanoverian Regiment in the farm found themselves confronted by a huge formation of KGL firing controlled volleys into the orange grove to flush out the French and Irish skirmishers.
What happened next was, as often happened in Napoleonic battles, a matter of turning the flank. If the Colonel le Grande Fromage could break the Portuguese and the Highlanders with his line infantry he before the voltigeurs broke he could march right up to the flanks of the British line. Similarly, if the KGL could rout the voltigeurs before the British flank broke then they could roll up the French line with ease.
In the end it was the Voltigeurs who broke first, having been reduced to just two men and having had their officer killed by an unlucky musket ball. This was the beginning of the end for the French. Having lost the flank (and 7 force moral points) Colonel le Grand Fromage decided he would order his men to withdraw. The battle was over. The Irish Legion had lost a lot of men, and a competent officer. The Scots and Portuguese had been badly battered but thanks to the heroic leadership of Major Ramsbottom, they had held off twice their numbers of French line.
Here are a few Photos from the game...
The French rush forward to push the Hanoverians in the farm yard while Major Ramsbottom leads the Portuguese and Scots out to hold the flank at all costs. |
The French (and Irish) Voltigeurs work their way through the orange grove to outflank the Hanoverian Regiment |
The KGL arrive to save the day...and the tide is turned. |
The Irish Voltiguers skirmishing in the orange grove |
Highland Light Infantry make their way through a copse of trees towards the Voltigeurs. |
The French Line try to batter the Portuguese and Scottish regiments, but they refuse to break. |
Finally the Voltiguers break, after fighting to almost the last man. |
Overall impressions of Sharp Practice were very favourable. It flows well, and has an instinctive and easy to learn mechanics. Its similarity in many ways to Chain of Command made it even easier for my players to pick up, as we have all played that game. Everyone liked it so much that they want another game at the next club night, but I will have to get some more French painted before then.
Labels:
Battle Report,
British,
French,
Napoleonic War,
Peninsular War,
Sharp Practice
Subscribe to:
Posts (Atom)